Buster Bar Ice Cream Dessert- Easy No-Bake Treat
Buster Bar Ice Cream Dessert has a way of transporting us back to simpler times, doesn’t it? That iconic combination of creamy chocolate, rich peanut butter, and a satisfying crunch is pure nostalgia in every bite. We all have our favorite frozen treats, but there’s something undeniably special about the Buster Bar. It’s more than just ice cream; it’s a delightful symphony of textures and flavors that hits all the right notes. The way the cool, smooth ice cream melts alongside the slightly salty, wonderfully creamy peanut butter center, all enveloped in a crisp chocolate shell, is simply divine. It’s the perfect pick-me-up, a delightful way to celebrate a small victory, or just an excuse to indulge in something truly delicious. Get ready to recreate that magic in your own kitchen with this easy-to-follow recipe for an unforgettable Buster Bar Ice Cream Dessert!
The Ultimate Buster Bar Ice Cream Dessert
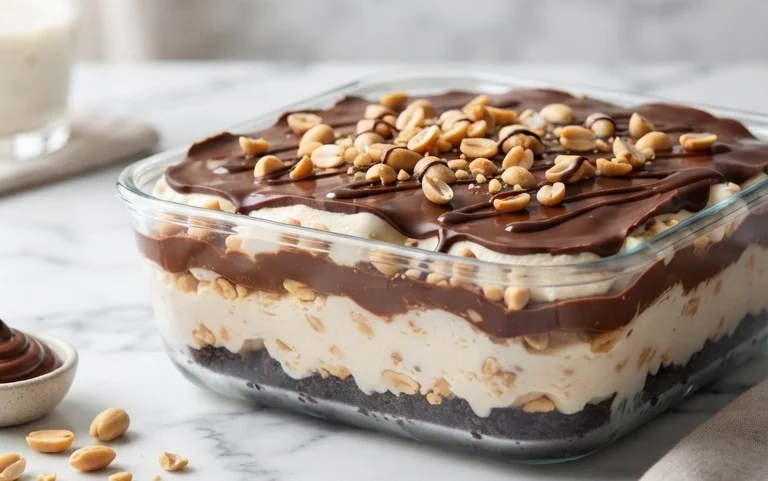
Get ready to transport yourself back to childhood with this incredibly easy and utterly delicious Buster Bar Ice Cream Dessert. This no-bake marvel captures all the nostalgic flavors and textures of the beloved ice cream truck treat, but in a generous pan that’s perfect for sharing. We’re talking about a crunchy Oreo crust, creamy vanilla ice cream, a rich peanut butter fudge topping, and a generous coating of chocolate. It’s a flavor explosion that’s surprisingly simple to make, making it an ideal dessert for potlucks, family gatherings, or just a special treat for yourself. You might want to double this recipe, because trust me, it disappears fast!
Ingredients:
Creating the Foundation: The Oreo Crust
The first step to achieving Buster Bar perfection is to create our wonderfully crunchy base. Take your entire package of Oreo cookies and crush them into fine crum extractbs. You can do this by placing them in a food processor and pulsing until they resemble coarse sand. Alternatively, if you don’t have a food processor, place the cookies in a large resealable plastic bag, seal it tightly, and then use a rolling pin to crush them into crum extractbs. It’s a great way to get some energy out! Once your Oreos are crum extractbed, pour them into a medium bowl. Add your melted butter to the crum extractbs. Stir everything together until all the crum extractbs are moistened. This mixture should hold together when you press it. Now, take a 9×13 inch baking pan. It’s helpful if you have a pan with sides that are at least 2 inches deep for this recipe. Press the Oreo and butter mixture evenly into the bottom of the pan to form your crust. Make sure to press it down firmly so it creates a solid base for our ice cream. You can use the bottom of a glass or a flat measuring cup to get a nice, even layer. Place this pan in the freezer while you prepare the next layer. We want it to be nice and firm.
Layering the Creaminess: Vanilla Ice Cream
Now for the star of the show – the ice cream! Take your half-gallon of vanilla ice cream out of the freezer and let it soften at room temperature. You don’t want it completely melted, just soft enough to be easily spreadable. This usually takes about 15-20 minutes, depending on the temperature of your kitchen. Once it’s softened to the right consistency, remove your pan with the frozen Oreo crust from the freezer. Carefully spoon the softened vanilla ice cream over the crust. Spread it out evenly with a spatula or the back of a spoon, making sure to reach all the edges and corners. You want a nice, thick, even layer of ice cream. Once the ice cream is spread, pop the pan back into the freezer. We need this layer to freeze solid again before we add the magic fudge topping. This usually takes at least an hour, but longer is better to ensure it’s firm.
The Irresistible Fudge Topping
This is where the true Buster Bar magic happens! In a medium saucepan, combine your semi-sweet chocolate chips, 1/2 cup of butter, and the evaporated milk. Place the saucepan over medium-low heat. Stir constantly as the butter melts and the chocolate chips begin extract to soften. It’s important to stir continuously to prevent the chocolate from burning and to ensure a smooth, glossy mixture. Keep stirring until all the chocolate chips are completely melted and the mixture is smooth and well combined. Once the chocolate mixture is smooth, remove it from the heat. Now, gradually whisk in the powdered confectioner’s sugar, a little at a time, until it’s fully incorporated and the fudge topping is thick and smooth. Be patient with this step; the powdered sugar will thicken the mixture considerably. You want a consistency that’s thick enough to coat the back of a spoon but still pourable.
Assembling the Masterpiece
Once your ice cream layer is frozen solid and your fudge topping is ready, it’s time to bring it all together. Take the pan with the frozen ice cream out of the freezer. Carefully pour the warm (not hot) fudge topping over the ice cream layer. Use a spatula to gently spread the fudge evenly across the entire surface of the ice cream, making sure to get it all the way to the edges. The warmth of the fudge will slightly melt the top of the ice cream, allowing them to meld together beautifully.
The Finishing Touch: Peanuts and Freezing
For the final, iconic touch, generously sprinkle the Spanish peanuts all over the fudge topping. Press them down gently so they adhere to the fudge. We’re aiming for that classic Buster Bar crunch in every bite. Now, cover the pan tightly with plastic wrap and then with aluminum foil. Place the Buster Bar Ice Cream Dessert back into the freezer. You’ll want to freeze it for at least 4-6 hours, or preferably overnight, to ensure it’s completely frozen and firm. This allows all the layers to set and meld together perfectly.
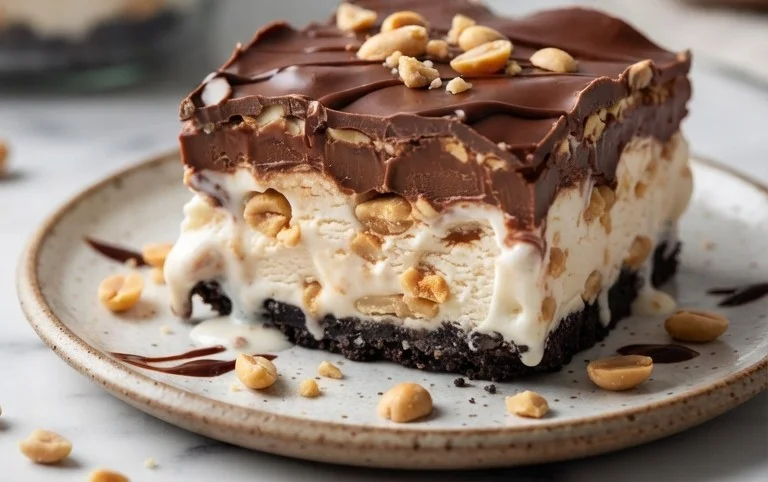
When you’re ready to serve, let the pan sit at room temperature for about 5-10 minutes to slightly soften the chocolate and fudge, making it easier to cut. Then, use a sharp knife dipped in hot water to cut the dessert into bars or squares. Enjoy your homemade Buster Bar Ice Cream Dessert – it’s a taste of pure joy!
Conclusion:
And there you have it – your very own homemade Buster Bar Ice Cream Dessert! This recipe truly captures the essence of that beloved frozen treat, delivering layers of chocolatey, peanut buttery, creamy perfection right in your own kitchen. It’s wonderfully simple to put together, making it an ideal project for any skill level, and the result is a dessert that’s guaranteed to impress your family and friends. The beauty of this Buster Bar Ice Cream Dessert lies in its versatility. Serve it directly from the pan for a rustic, crowd-pleasing experience, or slice it into elegant portions for a more refined presentation.
Don’t be afraid to get creative with variations! You could swirl in some caramel sauce for an extra decadent layer, add crushed peanuts for more crunch, or even experiment with different types of chocolate chips. I encourage you all to give this recipe a try; it’s a truly rewarding experience that will satisfy any sweet craving. Get ready to make your new favorite frozen dessert!
Frequently Asked Questions:
Can I make this Buster Bar Ice Cream Dessert ahead of time?
Absolutely! In fact, it’s best to make it at least 6-8 hours in advance, or even overnight. This allows the flavors to meld beautifully and ensures the dessert is perfectly set and wonderfully firm.
What kind of chocolate should I use for the topping?
For the best flavor and texture, I recommend using good quality semi-sweet or milk chocolate chips. You can also chop up your favorite chocolate bar for a richer taste. If you prefer a darker chocolate flavor, feel free to use dark chocolate chips.
Can I omit the peanuts in this recipe?
Yes, you can definitely omit the peanuts if you have allergies or simply don’t prefer them. The dessert will still be delicious! You might consider adding extra chocolate chips or some crushed pretzels for a different kind of crunch.
Buster Bar Ice Cream Dessert
A classic no-bake ice cream dessert featuring a chocolate cookie crust, creamy vanilla ice cream, a crunchy peanut topping, and a rich chocolate shell.
Ingredients
-
1 14.3 oz pkg. of Oreo cookies, crushed
-
1/2 C butter, melted
-
1/2 gal. vanilla ice cream, softened
-
1 lb. Spanish peanuts
-
2 C powdered confectioner’s sugar
-
12 oz semi sweet chocolate chips
-
1/2 C butter
-
12 oz evaporated milk
Instructions
-
Step 1
Combine crushed Oreo cookies and 1/2 C melted butter. Press into the bottom of a 9×13 inch pan. -
Step 2
Spread softened vanilla ice cream evenly over the cookie crust. -
Step 3
In a bowl, combine powdered sugar, Spanish peanuts, and the second 1/2 C butter. Mix until crumbly. -
Step 4
Sprinkle the peanut mixture evenly over the ice cream layer. -
Step 5
In a saucepan, melt chocolate chips with evaporated milk over low heat, stirring constantly until smooth. -
Step 6
Pour the chocolate mixture over the peanut layer, spreading to cover. -
Step 7
Freeze for at least 4 hours, or until firm. Cut into bars and serve.
Important Information
Nutrition Facts (Per Serving)
It is important to consider this information as approximate and not to use it as definitive health advice.
Allergy Information
Please check ingredients for potential allergens and consult a health professional if in doubt.