Easy Lemon Blueberry Cookies – Best Recipe
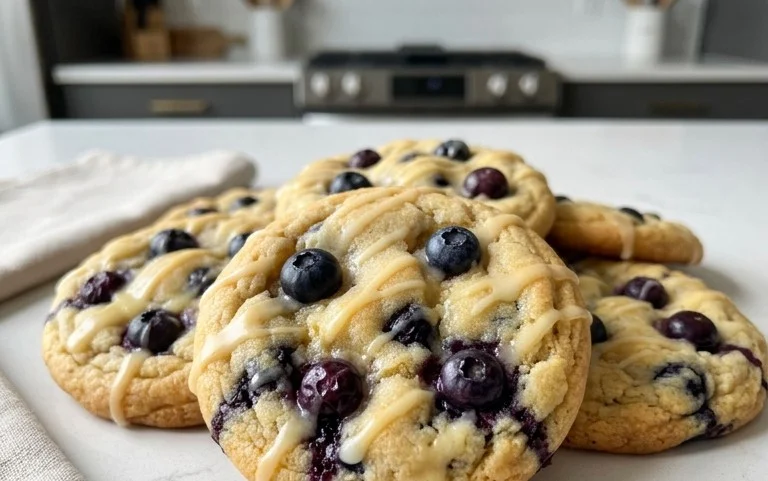
Lemon blueberry cookies recipe: the ultimate sunshine in a bite! There’s something undeniably magical about the way tart, vibrant lemon zest dances with the sweet burst of plump blueberries, all nestled within a perfectly tender cookie. These aren’t just any cookies; they’re a delightful symphony of flavors and textures that instantly brighten any day. I find myself craving them year-round, whether I’m looking for a refreshing afternoon treat or a sweet ending to a meal. What makes this lemon blueberry cookies recipe so special? It’s the effortless balance. The zesty lemon cuts through the sweetness, preventing it from becoming cloying, while the juicy blueberries offer little pockets of delightful surprise. They’re incredibly easy to make, making them perfect for both novice bakers and seasoned pros alike who just want a taste of pure, unadulterated joy. Get ready to fall in love with every crum extractb!
Lemon Blueberry Cookies Recipe
There’s something truly magical about the combination of bright, zesty lemon and sweet, juicy blueberries. It’s a flavor pairing that just screams sunshine and happiness, and it translates perfectly into a delightful cookie. Today, I’m so excited to share my favorite Lemon Blueberry Cookies recipe with you. These aren’t just any cookies; they’re tender, slightly chewy, bursting with fresh flavor, and have that perfect hint of citrus that makes them utterly irresistible. They’re perfect for an afternoon treat with a cup of tea, a cheerful addition to a picnic, or a lovely homemade gift for someone special. Get ready to fill your kitchen with the most incredible aroma!
Ingredients:
Cooking Instructions:
Let’s get baking! This recipe is straightforward and the results are so rewarding. We’ll start by getting our dry ingredients ready, then move on to creating that wonderfully flavored cookie base.
Step 1: Prepare the Dry Ingredients and Infuse the Lemon Flavor
First things first, let’s get our dry ingredients measured and whisked together. In a medium-sized bowl, combine the 2½ cups of all-purpose flour, 1 teaspoon of cornstarch, 1 teaspoon of baking powder, ¼ teaspoon of baking soda, and ½ teaspoon of salt. Whisk these together until they are thoroughly combined. The cornstarch is a little secret weapon here; it helps to create a wonderfully tender cookie crum extractb.
Now, for that incredible lemon punch! In a separate, larger bowl, we’re going to combine the 1½ cups of granulated sugar with the zest of our 3 small or medium lemons. This is where the magic begin extracts. Use your fingers to really rub the lemon zest into the sugar. You’ll notice the sugar becoming fragrant and slightly moist as the oils from the lemon zest are released. This step is crucial for maximizing the lemon flavor throughout the cookie, not just on the surface. Don’t rush this part; the more you can infuse that citrusy goodness, the better your cookies will taste.
Step 2: Create the Cookie Dough Base
Once your lemon-infused sugar is ready, it’s time to add the wet ingredients. Pour the 1 cup of melted unsalted butter into the bowl with the lemon-sugar mixture. Whisk them together until they are well combined. Next, add in your room-temperature large egg and the extra large egg yolk. Room temperature eggs incorporate much more easily into batters and doughs, creating a smoother, more homogenous mixture. Whisk these in until everything is smooth and well incorporated. Finally, stir in the 1 teaspoon of vanilla extract. This will add another layer of warmth and depth to the cookie’s flavor profile.
Now, gradually add the dry ingredients from the first bowl into the wet ingredients. Mix on low speed or by hand until just combined. Be careful not to overmix at this stage. Overmixing can develop the gluten in the flour too much, leading to tough cookies. We want tender, melt-in-your-mouth goodness, so mix until you no longer see streaks of dry flour.
Step 3: Gently Incorporate the Blueberries
This is where our star fruit, the blueberries, come into play. Gently fold in the 1 cup of fresh blueberries into the cookie dough. It’s important to do this by hand with a spatula or wooden spoon. We want to distribute them evenly without crushing them too much. Some berries might break a little, and that’s perfectly fine as it will add streaks of purple to your cookies, which is a lovely visual. If you are using frozen blueberries, do not thaw them first. Add them directly from the freezer. This helps prevent them from bleeding too much color into the dough.
Step 4: Chill and Shape the Cookies
Now, for a critical step that will ensure perfectly shaped and textured cookies: chilling the dough. Cover the bowl of cookie dough tightly with plastic wrap and refrigerate for at least 30 minutes, or up to 2 hours. Chilling the dough allows the fats to solidify, which prevents the cookies from spreading too much during baking. It also allows the flavors to meld together beautifully.
Once the dough is chilled, preheat your oven to 375°F (190°C) and line baking sheets with parchment paper. If you’re using the optional sugar for rolling, place the ¼ cup of granulated sugar in a shallow dish. Roll rounded tablespoons of the chilled dough into balls. If you are using the rolling sugar, gently roll each dough ball in the sugar until evenly coated. This adds a delightful sparkle and a little extra sweetness. Place the dough balls onto the prepared baking sheets, leaving about 2 inches between them to allow for spreading. You can gently flatten the tops slightly with the palm of your hand or the bottom of a glass if you prefer a flatter cookie, though they’ll spread on their own.
Step 5: Bake to Golden Perfection
Bake the cookies in the preheated oven for 10-12 minutes, or until the edges are lightly golden brown and the centers are set but still look slightly soft. The baking time will vary slightly depending on your oven and the size of your cookies, so keep an eye on them during the last few minutes. They will continue to cook and set up on the baking sheet after you remove them from the oven.
Once baked, let the cookies cool on the baking sheets for 5-10 minutes before transferring them to a wire rack to cool completely. This cooling period on the baking sheet is important for them to firm up properly.
These Lemon Blueberry Cookies are best enjoyed fresh, but they will keep in an airtight container at room temperature for up to 3 days. Enjoy every delicious, sunny bite!

Conclusion:
And there you have it – a simple yet incredibly rewarding Lemon Blueberry Cookies recipe! These cookies are a delightful fusion of bright, zesty lemon and sweet, bursting blueberries, all baked into a perfectly tender and slightly chewy cookie. They strike that ideal balance of flavors that’s both refreshing and comforting, making them an absolute winner for any occasion. I love that they’re not overly complicated, meaning you can whip up a batch of these delicious treats whenever a craving strikes, or for impromptu gatherings.
These Lemon Blueberry Cookies are fantastic on their own, but they truly shine when served with a tall glass of cold milk, a steaming cup of tea, or even a dollop of fresh whipped cream for an extra touch of indulgence. They make a wonderful addition to a brunch spread, a picnic basket, or simply as a delightful afternoon pick-me-up. Don’t be afraid to experiment with variations too! You could add a touch of lavender for a floral note, or swap out some of the blueberries for raspberries for a different berry burst.
I wholeheartedly encourage you to give this recipe a try. It’s guaranteed to become a favorite in your baking repertoire. The aroma alone will fill your kitchen with warmth, and the taste will leave you smiling. Happy baking!
Frequently Asked Questions:
Can I use frozen blueberries instead of fresh?
Yes, you absolutely can! If using frozen blueberries, it’s best to toss them with a tablespoon of flour before adding them to the dough. This helps to prevent them from bleeding too much color into the cookies and keeps them from becoming too mushy during baking. Make sure not to thaw them completely before adding them to the batter.
How should I store these Lemon Blueberry Cookies?
Once cooled completely, store your Lemon Blueberry Cookies in an airtight container at room temperature for up to 3-4 days. They tend to stay the freshest this way. If you live in a very warm climate, or if they seem to be drying out, you can pop in a slice of bread in the container – it helps to maintain moisture.
Can I make the dough ahead of time?
Definitely! Cookie dough, including this Lemon Blueberry Cookies dough, can often be made ahead. Once you’ve prepared the dough, you can wrap it tightly in plastic wrap and refrigerate it for up to 2-3 days. When you’re ready to bake, let the dough sit at room temperature for about 15-20 minutes to soften slightly, then proceed with shaping and baking as usual.
Lemon Blueberry Cookies
Delightful lemon blueberry cookies that are soft, chewy, and bursting with fresh flavors.
Ingredients
-
2½ cups (300 g) all purpose flour
-
1 tsp cornstarch
-
1 tsp baking powder
-
¼ tsp baking soda
-
½ tsp salt
-
1½ cups (300 g) granulated sugar
-
3 small or medium lemons, zested ((2 large lemons))
-
1 cup (226 g) unsalted butter, melted
-
1 large egg (US), room temperature
-
1 large egg yolk (US), room temperature
-
1 tsp (5 ml) vanilla extract
-
1 cup (105 g) fresh blueberries
-
¼ cup (50 g) granulated sugar for rolling (optional)
Instructions
-
Step 1
In a medium bowl, whisk together the flour, cornstarch, baking powder, baking soda, and salt. -
Step 2
In a large bowl, cream together the granulated sugar and lemon zest until fragrant. -
Step 3
Add the melted butter, egg, egg yolk, and vanilla extract to the sugar mixture and mix until well combined. -
Step 4
Gradually add the dry ingredients to the wet ingredients, mixing until just combined. Do not overmix. -
Step 5
Gently fold in the fresh blueberries. -
Step 6
Roll tablespoonfuls of dough into balls and then roll them in the optional granulated sugar. Place on a baking sheet lined with parchment paper. -
Step 7
Bake at 375°F (190°C) for 10-12 minutes, or until the edges are lightly golden brown and the centers are still slightly soft. -
Step 8
Let the cookies cool on the baking sheet for a few minutes before transferring them to a wire rack to cool completely.
Important Information
Nutrition Facts (Per Serving)
It is important to consider this information as approximate and not to use it as definitive health advice.
Allergy Information
Please check ingredients for potential allergens and consult a health professional if in doubt.