Salted Brownie Cookies- Irresistible Chewy Chocolate Delight
Salted brownie cookies are the ultimate treat for anyone who can’t decide between a fudgy brownie and a chewy cookie. These aren’t just any cookies; they’re a glorious hybrid, a decadent indulgence that has taken the baking world by storm. We all have a soft spot for a rich, chocolatey brownie, right? And who can resist the satisfying chew of a perfectly baked cookie? When you combine those irresistible qualities and add a sprinkle of flaky sea salt to cut through the sweetness, you get something truly magical. What makes these salted brownie cookies so special is their ability to deliver that intense brownie flavor and texture in a portable, perfectly portioned cookie form. It’s the best of both worlds, a harmonious balance of deep chocolate, satisfying chew, and that delightful salty finish that keeps you coming back for more. Get ready to bake up a batch of pure happiness!
Salted Brownie Cookies
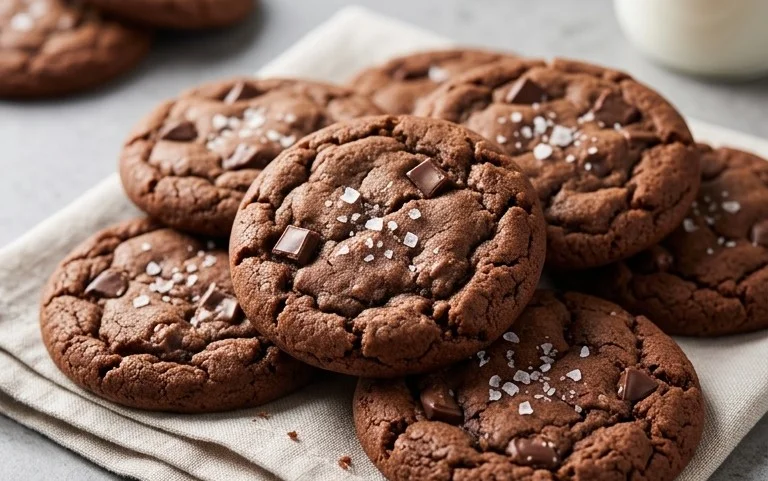
Get ready to experience the ultimate cookie indulgence. These Salted Brownie Cookies are everything you love about a fudgy, rich brownie, baked into a perfectly chewy, delightfully crisp-edged cookie. The hint of sea salt on top elevates the chocolate flavor to new heights, creating a truly irresistible treat that’s surprisingly easy to make. If you’re a chocolate lover, prepare to be obsessed.
Ingredients:
Making the Magic Happen
This recipe is all about building rich chocolate flavor and achieving that perfect brownie-cookie texture. Don’t be intimidated by the ingredients; we’re going to walk through each step to ensure you create cookie perfection. The use of room temperature eggs is crucial here. They emulsify better with the fats, leading to a smoother batter and more tender cookies. Letting your butter melt and then cool slightly is also a key step for the right texture.
Step 1: Prepare Your Dry Ingredients and Melt Your Chocolate
First things first, let’s get our dry ingredients ready. In a medium bowl, whisk together the 1 cup of all-purpose flour, 1 teaspoon of baking powder, and 1/8 teaspoon of salt. Whisking them together ensures that the baking powder and salt are evenly distributed, which will help our cookies rise properly and have a balanced flavor. Set this bowl aside.
Now, for the star of the show: chocolate! In a microwave-safe bowl, combine the 6 tablespoons of unsalted butter and 1 cup of semi-sweet chocolate chips. Microwave in 30-second intervals, stirring well after each interval, until the butter is completely melted and the chocolate chips are smooth and glossy. Be careful not to overheat the chocolate, as it can seize. Once melted and smooth, stir in the 1/4 cup of unsweetened cocoa powder and the optional 1 teaspoon of espresso powder. The espresso powder is a secret weapon that intensifies the chocolate flavor without making the cookies taste like coffee, so I highly recommend it if you have it on hand. Stir until everything is well combined and you have a thick, rich chocolate mixture. Let this mixture cool slightly for about 5-10 minutes while you move on to the next step. This slight cooling prevents it from cooking the eggs.
Step 2: Combine Wet Ingredients and Sugar
In a large bowl, whisk together the 2 large eggs (at room temperature, remember!), the 1 large egg yolk (also at room temperature), and the 1 cup of granulated sugar. You’ll want to whisk this vigorously until the mixture is pnon-alcoholic ale and slightly thickened, almost like ribbon stage, which usually takes about 2-3 minutes. This process incorporates air, which contributes to the texture of the cookies. Next, add the 1 tablespoon of vegetable oil and the 1 teaspoon of vanilla extract. Whisk them in until they are fully incorporated. The oil adds a lovely moistness to the cookies.
Step 3: Marry the Chocolate and Egg Mixtures
Now it’s time to bring our beautiful chocolate mixture and our egg and sugar mixture together. Gently pour the slightly cooled melted chocolate mixture into the egg and sugar bowl. Using a spatula, fold the chocolate mixture into the egg mixture until it’s just combined. It’s important not to overmix here. We want to incorporate the chocolate without deflating all the air we just whisked into the eggs. The batter will be thick and glossy at this stage, looking very much like brownie batter.
Step 4: Incorporate Dry Ingredients and Add Extra Chocolate Chips
Add the dry ingredients (the flour mixture you set aside earlier) to the wet chocolate mixture. Again, use your spatula to gently fold the dry ingredients into the wet until just combined. It’s very important not to overmix at this stage. Overmixing can develop the gluten in the flour too much, resulting in tough cookies. A few streaks of flour are okay; they will disappear as the batter rests slightly. Now, fold in another handful of semi-sweet chocolate chips. These extra chips will provide pockets of melted chocolate goodness in every bite.
Step 5: Scoop, Top, and Bake!
Line your baking sheets with parchment paper. This is a game-changer for easy cleanup and prevents cookies from sticking. Using a medium cookie scoop or two spoons, portion out the dough. For perfectly sized cookies, I recommend about 1.5 to 2 tablespoon-sized scoops. Roll the dough into balls and place them onto the prepared baking sheets, leaving about 2 inches between each cookie as they will spread.
For that signature brownie-cookie look and extra chocolatey punch, gently press a few extra semi-sweet chocolate chips onto the tops of each cookie dough ball. If you’re feeling fancy and want that salty-sweet contrast, lightly sprinkle the tops of the cookies with sea salt flakes. This is optional but highly recommended for the full experience!
Preheat your oven to 350°F (175°C). Bake for 10-12 minutes, or until the edges are set and look slightly cracked, but the centers still look a little soft and fudgy. They will continue to bake slightly on the hot baking sheet after you remove them from the oven. This is the key to achieving that perfectly chewy interior with slightly crisp edges.
Cooling and Enjoying
Let the cookies cool on the baking sheet for about 5-10 minutes before carefully transferring them to a wire rack to cool completely. This allows them to firm up properly. Once cooled, dive in! These Salted Brownie Cookies are best enjoyed warm, but they also keep well in an airtight container at room temperature for several days. Prepare for compliments – these are truly special!

Conclusion:
I hope you’ve enjoyed diving into the delicious world of these salted brownie cookies! This recipe is truly a winner because it masterfully combines the rich, fudgy intensity of a brownie with the delightful chegrape juicess and slightly crisp edges of a cookie. The pinch of sea salt on top is the secret weapon, cutting through the sweetness and amplifying all those deep chocolate notes. They are incredibly satisfying and surprisingly easy to whip up, making them perfect for any occasion, from a casual afternoon treat to a crowd-pleasing dessert at a party.
For serving, these salted brownie cookies are divine on their own, perhaps with a cold glass of milk or a steaming mug of coffee. They also make an excellent accompaniment to vanilla ice cream for an ultimate indulgence. Feeling adventurous? Try adding some chopped nuts like walnuts or pecans to the dough for extra texture, or swirl in a tablespoon of peanut butter before baking for a delightful flavor twist. I absolutely encourage you to give this recipe a try – you won’t be disappointed!
Frequently Asked Questions:
Can I make these cookies ahead of time?
Absolutely! These salted brownie cookies can be stored in an airtight container at room temperature for up to 3 days, or in the refrigerator for up to a week. You can also freeze the unbaked dough balls for up to 3 months, then bake them directly from frozen, adding a couple of extra minutes to the baking time.
What kind of chocolate should I use?
For the best brownie cookie flavor, I recommend using good quality semi-sweet or dark chocolate chips or chunks. Using a combination of both can also yield fantastic results, offering a deeper chocolate complexity. Avoid milk chocolate, as it can make the cookies overly sweet.
My cookies spread too much, what did I do wrong?
Over-spreading can often be due to the dough being too warm when baked, or if there’s too much butter or sugar. Ensure your butter is softened but not melted, and try chilling the dough for at least 30 minutes before baking. This helps the cookies hold their shape and achieve that perfect chewy center with slightly crisp edges.
Salted Brownie Cookies
Rich, fudgy brownie cookies with a hint of salt, perfect for any chocolate lover.
Ingredients
-
1 cup All-Purpose Flour
-
1 tsp Baking Powder
-
1/8 tsp Salt
-
2 Large Eggs (room temperature)
-
1 Large Egg Yolk (room temperature)
-
1 cup Granulated Sugar
-
1 tbsp Vegetable Oil
-
1 tsp Vanilla Extract
-
6 tbsp Unsalted Butter
-
1 cup Semi-Sweet Chocolate Chips
-
1/4 cup Unsweetened Cocoa Powder
-
1 tsp Espresso Powder (optional)
-
Sea Salt Flakes (for topping cookies (optional garnish))
Instructions
-
Step 1
Preheat oven to 350°F (175°C) and line baking sheets with parchment paper. -
Step 2
In a medium bowl, whisk together the flour, baking powder, and 1/8 tsp salt. Set aside. -
Step 3
In a large bowl, whisk together the eggs, egg yolk, granulated sugar, vegetable oil, and vanilla extract until well combined and slightly lighter in color. -
Step 4
Melt the unsalted butter in a microwave-safe bowl or on the stovetop. Stir in the unsweetened cocoa powder and espresso powder (if using) until smooth. Add this mixture to the wet ingredients and whisk until fully incorporated. -
Step 5
Gradually add the dry ingredients to the wet ingredients, mixing until just combined. Do not overmix. -
Step 6
Fold in 1 cup of semi-sweet chocolate chips. -
Step 7
Drop rounded tablespoons of dough onto the prepared baking sheets, about 2 inches apart. If desired, press a few extra chocolate chips and sea salt flakes onto the tops of the cookies before baking. -
Step 8
Bake for 10-12 minutes, or until the edges are set and the centers are still slightly soft. The cookies will continue to set as they cool. -
Step 9
Let the cookies cool on the baking sheets for a few minutes before transferring them to a wire rack to cool completely.
Important Information
Nutrition Facts (Per Serving)
It is important to consider this information as approximate and not to use it as definitive health advice.
Allergy Information
Please check ingredients for potential allergens and consult a health professional if in doubt.