Daisy Lemon Meringue Pies-Zesty & Sweet Delight
Daisy Lemon Meringue Pies are a truly enchanting dessert, a classic that consistently brings smiles to faces. There’s something undeniably magical about that perfect balance of tangy, bright lemon filling encased in a buttery, flaky crust, all crowned with billowy, cloud-like meringue. This is more than just a pie; it’s a celebration of simple, pure flavors that evoke warmth and nostalgia. People adore Daisy Lemon Meringue Pies because they offer a delightful contrast: the sharp citrus cuts through the sweetness of the meringue, creating a flavor profile that’s both invigorating and comforting. What makes this particular rendition of Daisy Lemon Meringue Pies so special is its effortless elegance. It’s a dessert that feels both sophisticated enough for a special occasion and delightfully approachable for an everyday treat. Imagin extracte the golden crust, the sunny yellow filling, and the peaks of toasted meringue – it’s a visual and gustatory masterpiece waiting to be enjoyed.
Daisy Lemon Meringue Pies
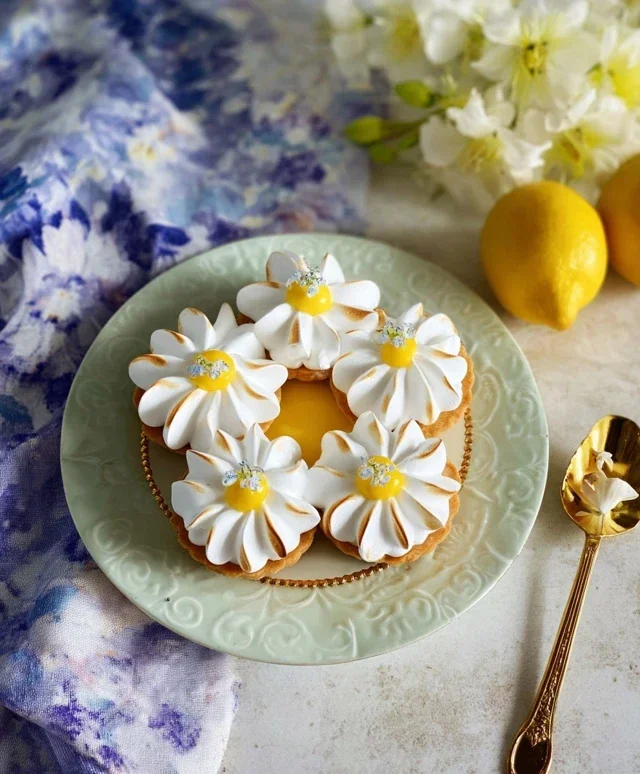
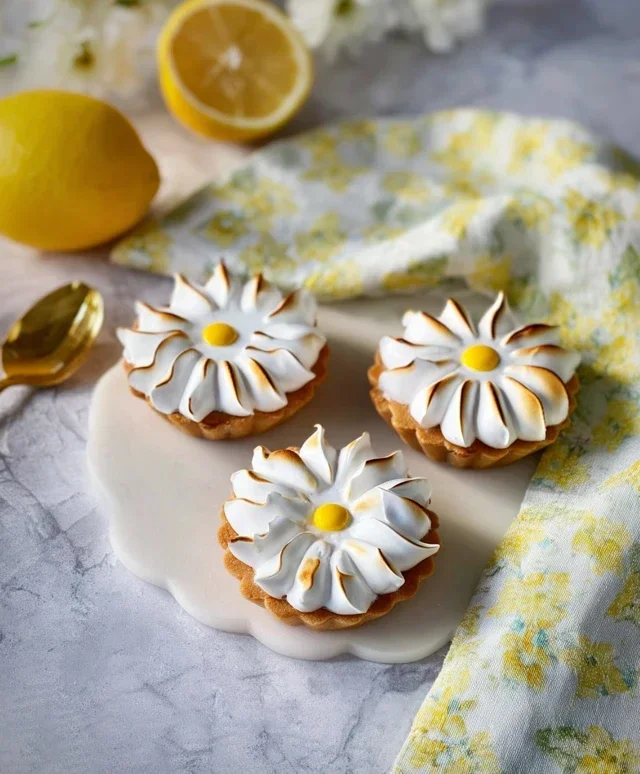
There’s something undeniably cheerful about a lemon meringue pie. The bright, tangy lemon curd encased in a crisp, buttery crust, all crowned with a cloud of sweet, glossy meringue – it’s a dessert that brings smiles. And these individual Daisy Lemon Meringue Pies? They take that classic delight and miniaturize it, making them perfect for parties, afternoon tea, or just a delightful treat all to yourself. The “daisy” comes from the way we’ll swirl the meringue, creating little peaks that resemble flower petals. It’s a truly rewarding bake, and I’m so excited to share this recipe with you.
Ingredients:
Instructions:
Making the Sweet Pastry Cases
The foundation of our little pies is a wonderfully crisp and sweet pastry. It’s quite straightforward to make, and the key is keeping everything cold.
1. In a medium bowl, whisk together the 125g plain flour and 35g icing sugar. This ensures the sugar is evenly distributed throughout the flour, which will give us a delicate sweetness to the crust. Add the 60g cold unsalted butter, cut into small cubes. Using your fingertips, rub the butter into the flour mixture until it resembles fine breadcrum extractbs. You want to work quickly here to prevent the butter from warming up too much. If you have a food processor, you can pulse the ingredients until you achieve this texture – just be careful not to overmix.
2. Next, we add the wet ingredients. Make a well in the center of the flour and butter mixture. Add the 1 large egg yolk and 1 tbsp water. Bring the mixture together with a knife or a spatula until it just starts to form a dough. Don’t overwork the dough at this stage; you want to avoid developing the gluten too much, which can make the pastry tough. Once it has come together, gently bring it into a ball with your hands. Wrap the dough in cling film and refrigerate for at least 30 minutes. This chilling period is crucial as it allows the gluten to relax and the fat to firm up, resulting in a much flakier and easier-to-handle pastry.
3. Preheat your oven to 190°C (170°C fan/375°F/Gas Mark 5). Lightly flour a clean surface and roll out the chilled pastry until it’s about 3mm thick. You want to roll it from the center outwards to avoid stretching the dough. Using a round cutter slightly larger than your tartlet tins or muffin tin cups, cut out circles of pastry. Carefully line your tins, pressing the pastry gently into the base and up the sides. Prick the bases all over with a fork – this helps to prevent the pastry from puffing up during baking. For the best results, I like to blind bake the pastry. Line each pastry case with a small piece of baking parchment and fill with baking beans or uncooked rice. Bake for 10-12 minutes, then remove the parchment and beans and bake for another 5-7 minutes, or until the pastry is lightly golden and looks dry. Let them cool completely in the tins before attempting to remove them.
Whipping Up the Zesty Lemon Curd
This lemon curd is sunshine in a jar – bright, tangy, and incredibly smooth. It’s surprisingly easy to make and worth every bit of effort.
1. While your pastry cases are cooling, let’s make the lemon curd. In a heatproof bowl set over a saucepan of gently simmering water (ensure the bottom of the bowl doesn’t touch the water), whisk together the 4 large egg yolks and 150g granulated sugar. Whisk continuously until the sugar has dissolved and the mixture is pnon-alcoholic ale and slightly thickened. This gentle heating prevents the eggs from scrambling.
2. Gradually whisk in the 100ml fresh lemon juice. Continue to cook and stir the mixture over the simmering water for about 8-10 minutes, or until the curd has thickened enough to coat the back of a spoon. It’s important to keep stirring constantly to ensure an even cooking and prevent any lumps from forming. Once thickened, remove the bowl from the heat and stir in the 50g cubed unsalted butter, one cube at a time, until it has completely melted and is incorporated into the curd, giving it a beautiful glossy sheen. Strain the curd through a fine-mesh sieve into a clean bowl to ensure it’s perfectly smooth. Cover the surface of the curd directly with cling film to prevent a skin from forming and let it cool completely.
Creating the Cloud-Like Meringue
The meringue is the showstopper! We’re aiming for stiff, glossy peaks that will caramelize beautifully in the oven.
1. Once your lemon curd has cooled, it’s time for the meringue. Ensure your egg whites are at room temperature, as they will whip up to a greater volume this way. In a very clean, grease-free bowl, whisk the 4 large egg whites until they form soft peaks. This means when you lift the whisk, the peaks curl over. Gradually add the 200g granulated sugar, one tablespoon at a time, whisking well after each addition. Continue whisking until the meringue is stiff, glossy, and the sugar has completely dissolved. To check for dissolved sugar, rub a little bit of the meringue between your fingers – it should feel smooth, not gritty.
2. Carefully spoon the cooled lemon curd into your pre-baked pastry cases, filling them almost to the brim. Then, spoon generous dollops of the meringue over the lemon curd. Use the back of your spoon to create swirls and peaks, mimicking daisy petals. You can also use a piping bag fitted with a star nozzle for a more defined petal effect.
3. Finally, bake the pies in the preheated oven at 190°C (170°C fan/375°F/Gas Mark 5) for about 5-8 minutes, or until the meringue is lightly golden brown. Keep a very close eye on them as they can brown quickly. Allow the Daisy Lemon Meringue Pies to cool completely before serving. They are best enjoyed on the day they are made for the crispiest crust. Enjoy these delightful little bursts of sunshine!
Conclusion:
And there you have it – your guide to creating stunning and delicious Daisy Lemon Meringue Pies! This recipe truly shines because it balances a wonderfully tart lemon filling with a cloud-like, sweet meringue, all nestled in a perfectly flaky crust. It’s a classic dessert that’s surprisingly achievable at home and is guaranteed to impress. Imagin extracte the delighted faces as they take their first bite of this bright, zesty treat!
These pies are fantastic served chilled, perhaps with a few extra fresh raspberries or a dollop of whipped cream for added decadence. For a delightful twist, consider infusing your lemon filling with a hint of lavender or adding a touch of limoncello for an adult-friendly version. Don’t be shy to experiment with different crust recipes, like a grabeef ham cracker or shortbread base, to personalize your Daisy Lemon Meringue Pie even further. I truly encourage you to give this recipe a try – it’s a rewarding baking experience with an absolutely spectacular payoff.
Frequently Asked Questions:
Why is my meringue weeping or watery?
Weeping meringue is often caused by undercooking or by the meringue not being fully incorporated into the hot lemon filling. Ensure your lemon curd is cooked to a thickened consistency, and when adding the meringue, make sure it forms a seal with the crust and the filling all the way around. Also, avoid over-beating your egg whites; they should be stiff but not dry.
Can I make the lemon filling ahead of time?
Yes, you can definitely make the lemon filling a day in advance! Let it cool completely, then cover it tightly with plastic wrap, pressing the wrap directly onto the surface of the filling to prevent a skin from forming. Store it in the refrigerator until you’re ready to assemble and top with meringue.
How do I get perfectly browned meringue peaks?
The key to those beautiful browned peaks is a combination of oven temperature and time, or the use of a kitchen torch. If using an oven, a moderate temperature (around 350°F or 175°C) for a shorter duration after the pie has baked helps brown the meringue without cooking the filling. Alternatively, a kitchen torch offers precise control for browning individual peaks for a truly artisanal look.
Daisy Lemon Meringue Pies
Individual lemon meringue pies with a crisp pastry base and a bright, tart lemon filling topped with fluffy meringue.
Ingredients
-
125g plain flour
-
35g icing sugar
-
60g cold unsalted butter
-
1 large egg yolk
-
1 tbsp water
-
For the filling: 3 large eggs (separated)
-
200g caster sugar
-
100ml fresh lemon juice
-
50g unsalted butter
-
1 tbsp cornflour
-
For the meringue: 3 large egg whites
-
150g caster sugar
Instructions
-
Step 1
For the pastry, rub the butter into the flour and icing sugar until it resembles breadcrumbs. Mix in the egg yolk and water to form a dough. -
Step 2
Chill the dough for 30 minutes. Roll out and line 4 individual pie tins. Prick the bases with a fork. -
Step 3
Bake the pastry cases at 190°C (170°C fan/Gas 5) for 15 minutes until lightly golden. Set aside. -
Step 4
For the filling, whisk the egg yolks and caster sugar together. Stir in the lemon juice and cornflour. Cook gently over a bain-marie until thickened, stirring constantly. Remove from heat and stir in the butter. -
Step 5
Pour the lemon filling into the pre-baked pastry cases. -
Step 6
For the meringue, whisk the egg whites until stiff peaks form. Gradually add the caster sugar, whisking until smooth and glossy. -
Step 7
Spoon the meringue over the lemon filling, ensuring it seals to the edge of the pastry to prevent shrinking. Swirl to create peaks. -
Step 8
Bake at 180°C (160°C fan/Gas 4) for 15-20 minutes, or until the meringue is golden brown and crisp.
Important Information
Nutrition Facts (Per Serving)
It is important to consider this information as approximate and not to use it as definitive health advice.
Allergy Information
Please check ingredients for potential allergens and consult a health professional if in doubt.